Roster Manager Screen
You can access the Roster Manager/Advance Rostering screen by clicking on the following icon:

You will then see the Roster Manager/Advance Rostering screen.
Depending on your version of Softworks, this screen may be referred to as Roster Manager or Advance Rostering. The functionality of the screen is the same however, and it will be referred to as Roster Manager for the rest of this section of the manual.
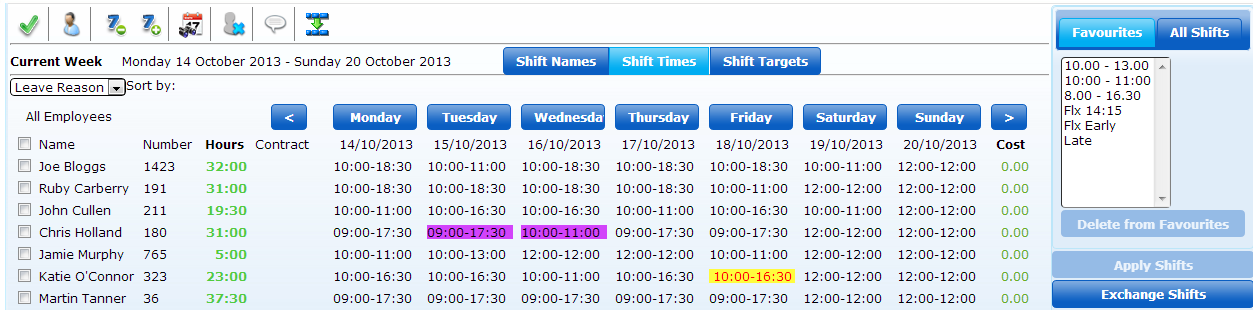
The purpose of the screen is to allow rosters to be edited in a quick and simple format. Rosters are assigned to employees in the Personnel details screen, however, if rostering in your organisation changes from week to week, then Roster Manager will be needed. This screen allows you to change shifts worked on any day for any employee, so that those shifts will be seen on the Clockcard.
Costing is also an important part of the Roster Manager screen, and if you have the Costing module, then you will see costing information for rosters, which calculate in real-time.
The general process for using the Roster Manager screen is to firstly, select the employees you wish to roster from the Company Structure screen. Next open the Roster Manager screen and move forward to the week you wish to roster for. Now you are ready to roster.
Depending on your preferred method of rostering, you may view shifts either by their name or the times of the shift. Click on the appropriate box to view Shifts in your preferred method:

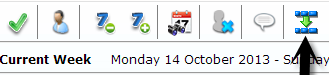
You can change the period that you wish to view by clicking on the Plus/Minus Seven days icon, or you can move forward/backward a day by clicking on the arrow icons as seen below:
![]()
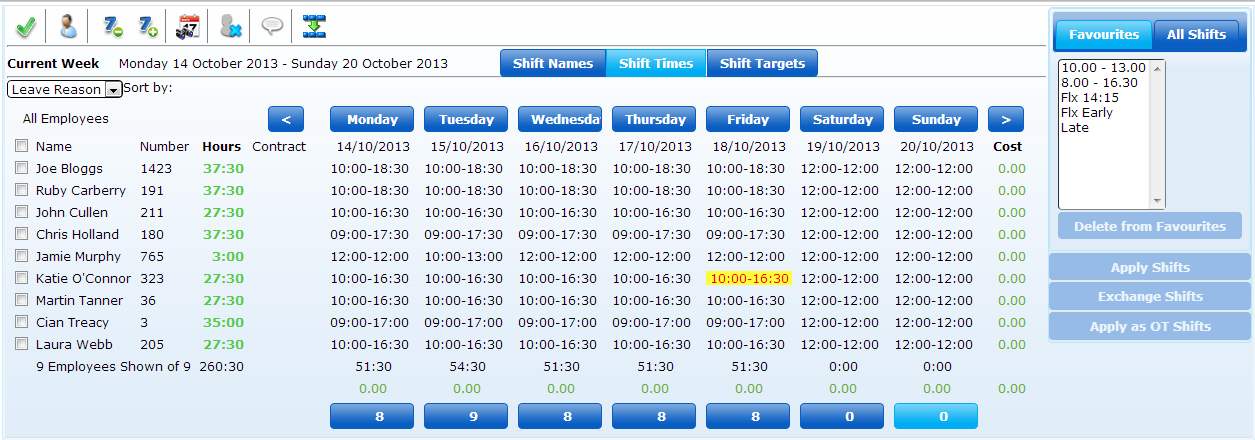
It is important to consider Absences when rostering, and Roster Manager takes that into account. Any absences that have been entered into the system are highlighted in yellow in the Roster Manager screen, as seen below.

To view more information about the absence, highlight the employee concerned and click on the day. You will now see the absence information for the day. To enter absences you must use the Absence Entry screen, as absence cannot be entered from the Roster Manager screen.
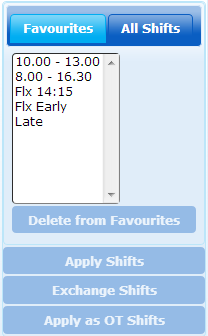
To the right hand side of the screen, there is a list of all company shifts. This is split into All Shifts and Favourites. By default when you log into the Roster Manager screen, the list of Favourite Shifts is open. Therefore it is advised to move your most used shifts to Favourites.
To move Shifts from All Shifts to Favourites, select the relevant shift in the All Shifts list. This will then activate the “Add to Favourites” button, as you can see below;
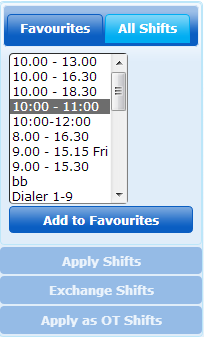
Click “Add to Favourites” and it will move the Shift from All Shifts to Favourites. Should you need to delete a shift from Favourites, select the shift from the list of Favourites and select the “Delete from Favourites” button.
It is important to note, all shifts you move to Favourites are specific to each Users login. This can be helpful as different departments and managers may have different “Favourite” shifts.
You can roster one employee or a group of employees at a time. Click on the relevant shifts, using the persons names to the left of the grid and the relevant days above.
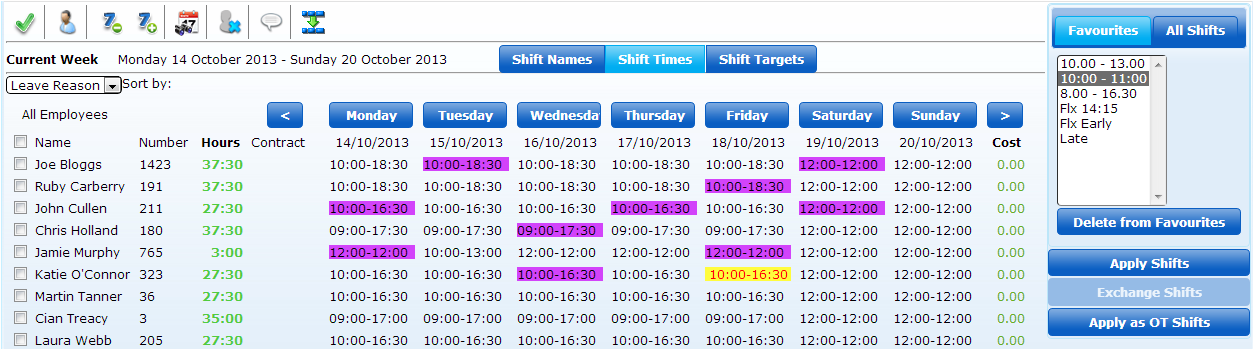
The selected Shifts will now be highlighted in purple.
From your list of Shifts to the right hand side of the screen, select the shift you want to change all highlighted (purple) shifts to. Selecting the shift from the list of Favourites or All Shifts, will activate the “Apply Shifts” button.
Once you are happy with your selections, click “Apply Shifts”
You will get a pop up screen as below;

If you are happy to proceed, click OK and the changes will be applied to the Roster.
It may be necessary to Exchange Shifts. This may be for one employee, switching shifts on two particular days. Alternatively, two employees may exchange shifts.
To do this, select the two relevant shifts from the Roster Manager screen. When you select two shifts, the “Exchange Shifts” button will become active. Select this option to update your Roster
After you have updated a Roster for an employee or group of Employees, you may want them to work the same sequence of shifts in the future. To do this, copy the updated Roster to another week. You can do this with the “Copy Down” icon
Firstly, ensure you have selected the relevant employee’s rosters/work patterns that you want to copy forward. To do this, select the tick box beside the employee’s name. Once you selected the employee’s select the Copy Down icon
The following will now be visible on the Roster Manager Screen
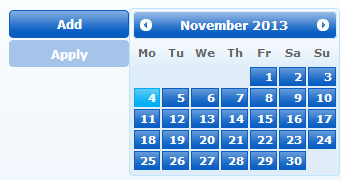
Once you select a relevant week starting date, the Add button will activate. You can select one week, or should you wish to copy multiple weeks, just continue to select the week starting date and click “Add”
You can use the scroll icons to move between months
All relevant dates you select will be outlined on the screen

You have the ability to delete a week range if required.
Once you are happy with your selections, you can click Apply and your Roster/Work Pattern will be copied to the weeks selected.
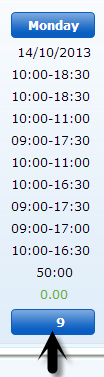
The total amount of hours worked by an employee are shown on the Roster Manager screen next to their name, in the Hours column
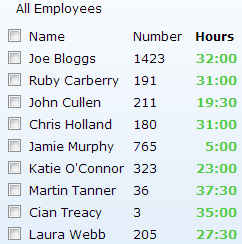
This total is the totals from the target hours of each employee’s shifts for the week.
There is also a Total row at the bottom of the Roster Manager Screen. At the bottom of each days shifts is a total of the hours worked that day by all employees in the selection. These figures update in real time as rosters are updated. Please see an example below;
![]()
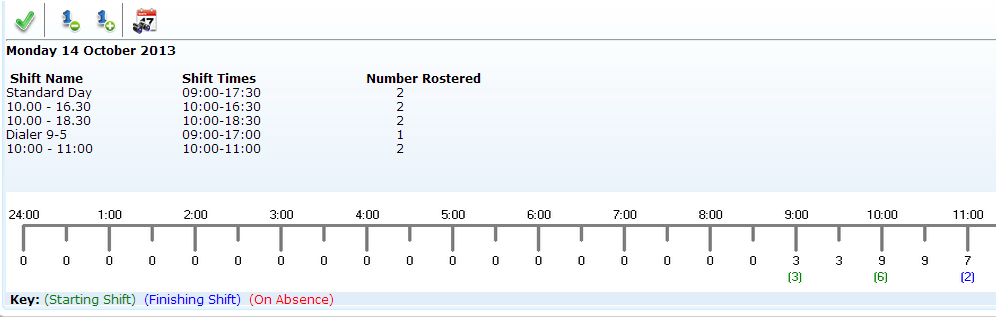
The Roster Manager screen also includes Shift Staffing Levels. This displays information on a timeline showing when employees begin shifts and leave, and also how many employees are working during different periods of the day. It is useful to ensure that you have enough employee working at key periods of the day.
To access the Shift Staffing Levels screen, click o the Shift Staffing Levels icon below the day you wish to view, as seen below.
You will now see the Shift Staffing Levels screen:
You may move forward and backward days by using the Plus/Minus One day icons, and go to a specific date with the Go To Date icon.
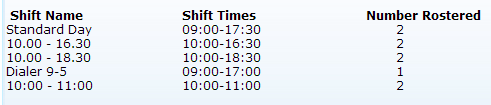
This screen is not editable as it only displays the roster for the day as per the Roster Manager screen. The day selected is shown and below are a list of shifts that are being worked that day, along with the amount of staff working those shifts.
At the bottom of the screen is the Staffing Level timeline.

This timeline shows the hours and totals of employees starting their shift (Green), finishing their shift (Blue), and any employees who are absent (Red). Each time point has a total underneath it to show the amount working at that time. In the above example, at 8.00am there are Zero employees, and at 9.00am there are 3 employees start their shift. At 10am another 6 employees start, therefore increasing the staffing level to 9