You can access the Clockcard screen by clicking on the following icon:

The clockcard is the core of the Softworks system, as it is here that the times and hours that employees work is recorded here. The times that employees clock in and clock out are recorded, and according to the rules of your organisation, these are calculated to give hours totals.
Clockings can be fed into the system using a variety of methods according to your organisations needs. Clockings can be fed from a Clocking Machine, where an employee swipes a badge, their hand/fingerprint is scanned, or a code is entered. Clockings can also be recorded from an individuals workstation, automatically entered by the system (assumed clockings) or even manually. The method of clocking is irrelevant for this screen, as regardless of the method used, the information appears here.
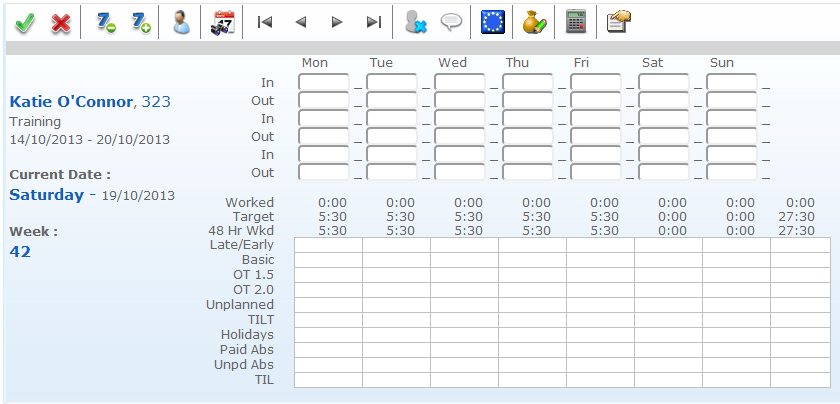
This section is where clockings for a specific employee are stored. In the example above, there is space for up to 8 clockings for any given day. 8 clockings would cover an employee who
The amount of clockings found in this area of the screen depends upon the amount of times your organisation requires the employee to clock in and out. As a simple rule of thumb, there should always be an even amount of clockings for any day that has passed. Whether there are 2 clockings (start and end of shift), or 4, 6, or 8, it should always be an even number. An odd number of clockings means a clocking has been missed, or that there are too many.
Clockings appear in the clockcard in hours and minutes (not industrial minutes).
Here is an explanation of the columns and the information they contain on the clockcard:
![]()
Worked – The total amount of time between clockings is displayed here. If two clockings exist for 09.00 and 17.00, then the hours worked will be seen as 8.00. If there are four clockings for 09.00/13.00/14.00/17.00, then the total will be 7.00 hours as an hour will be deducted for the break.
Target – Target hour are the amount of hours that the employee is expected to work according to the shift they are working. Many rules can be attributed to Target hours, such as “No overtime before target is reached”. This would mean that the employee has to work a certain amount of hours a day before they would get overtime.
48 Hr Wkd – The figure here lists the hours worked with relevance to the Working Time Directive. The reason this figure can be different from the hours worked, is that breaks (whether paid or unpaid) will be deducted here.
Depending on you organisations setup, you may see different information listed here.
At the bottom of the clockcard screen, all the totals of the hours are recorded. Each row represents a “bucket” that different correction codes will sit in. For instance, PdAbs is a bucket for any kind of paid absence, depending on your set-up. The categories here are very flexible and can be renamed, contents edited and shuffled to appear in the order you wish.
Bas – This is the amount of hours basic time worked. Basic time is seen as any standard hours paid at a standard rate usually.
OT1.5 – This represents over time at ‘time and a half’ usually.
OT2 – This represents overtime at ‘double time’ usually
UnHrs – Unauthorised Hours. Hours recorded here are usually those that await a manager’s approval before being defined as overtime, or time in lieu
Hols – This represent Holiday hours
PdAbs - This bucket contains all paid absences not covered otherwise onscreen, such as training, force majeure, parental leave, and possibly sickness.
Late – This represents any late starts recorded as per the rules of your organisation
Early – This represents any early ending of a shift, as per the rules of your organisation
UnPdAbs – Unpaid Absences. This bucket contains any unpaid absences not covered elsewhere, such as unpaid holidays and unpaid sick leave
TILE – Time in Lieu Earned. This bucket displays the positive amount of hours earned that increases an employees time in lieu balance.
TILT – Time in Lieu Taken. This bucket displays the negative amount of hours that decreases the employees time in lieu balance.
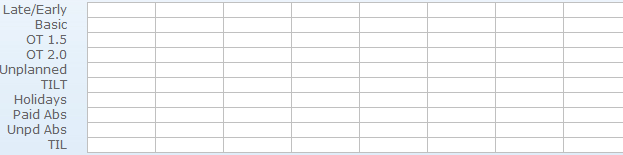
Here is an example of a totals section that is populated
In this example there are basic hours, unauthorised overtime, an occasion of late and also a holiday absence. To the far right are the totals for the week in question.
The totals section of the clockcard is merely a summary of the real data that is visible in the Employee Corrections screen. As previously described, the totals work as buckets that bucket different correction codes together. An example of this is Paid Absences that displays the totals of different types of Paid absences into one field.
The Employee Corrections screen is accessed by double clicking over the totals of the day that you wish to view. For example, to change a correction on Thursday in the example above, double clicking anywhere in the Thursday column at bottom of the screen, will open the following;
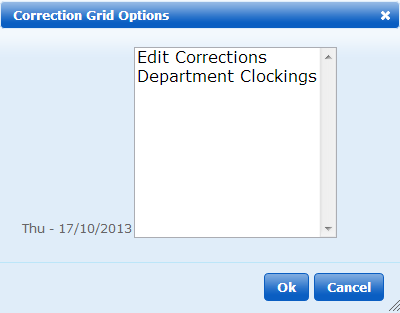
Click on Edit Corrections and click OK. This will open the following screen
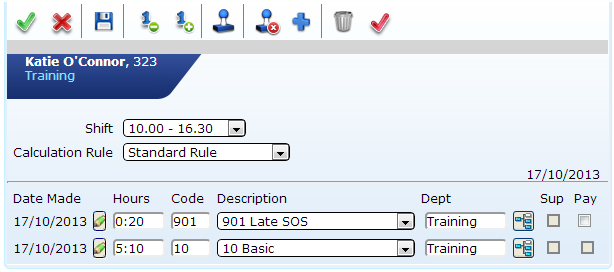
The Employee Corrections screen is divided into different sections as seen in this image. It is possible to see information in relation to the Employee as well as the breakdown of any hours worked or, when relevant, any absences taken.
Any changes that are made in here will affect the information on the main clockcard screen, as it is here that the data is sourced from.
The Shift can be set here for a specific day by clicking on the Shift drop down list to select a shift from the list of available shifts.
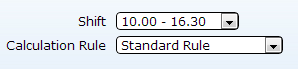
The Calculation Rules can also be set here, by clicking on the drop down list and selecting the appropriate rule. There are generally four different Calculation Rules, Company Shutdown, Public Holiday, Unscheduled Day Rule and Standard Rule.
These rules affect how the hours for the day are calculated.
A standard working day calculates using the Standard rule, generally setting all normal hours to basic.
The Unscheduled Day Rule calculates the hours, as they should be when the employee should not work. The best example of this is an employee working on a rest day would not get basic but overtime.
On a Bank Holiday, the employee would generally get different rates too, so the Public Holiday rule is used.
This applies also to employee’s who work through a company shutdown period, where the Company Shutdown rule would apply
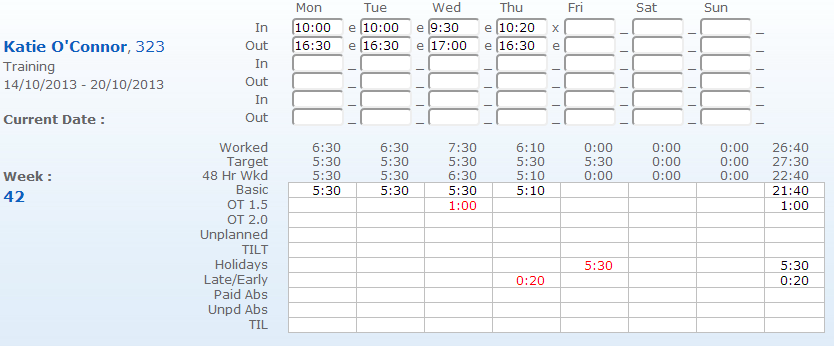
At the bottom of the window, the actual correction codes information is stored. These are the details of the hours worked in their most basic format, not assigned to any bucket but seen as they are. In the example below there is 0:20 of lates, and 5:10 of basic.

Clockings are generally imported into the system but it is possible to manually enter/edit clockings into Softworks.
To enter a clocking, click on the field where you wish to enter the clocking and type the time required. Remember that it is 24 hour clock, and should be in hours and minutes
When you have entered a manual clocking you will see an “e” next to the clocking, and the day will turn yellow. You will need to recalculate the clockings for the hours to appear in the totals section
You can recalculate with the icon on the Clockcard Toolbar

To find an employee, you may use either the Employee Cycle icons or the find an employee icon
It is possible to move back and forward through weekly clockcards by clicking on the plus/minus 7 days icons.

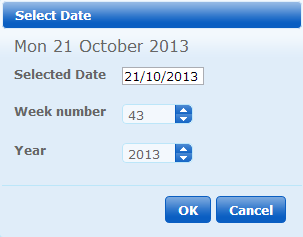
If you need to access a specific date, click on the “go to date” icon.

Now enter the date you require, and press ok
You may wish to manually tell the system to recalculate a day. This can occur when you have already made changes to the system, the day has become locked, and you then unlock the day requiring a recalculation to return to normal.
Left-click on the name of the day you wish to recalculate and select Recalculate from the list that opens and click OK
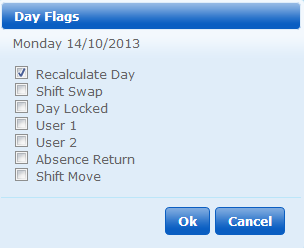
Next, select the recalculate icon from the Clockcard screen toolbar and the day will be recalculated.
The most common “flags” that a user will see in the system are “e” and “x”. All other flags are specific to set criteria. For example, if your organisation does not roster employees to be “on call” then you will never see the “c” flag.
E – An “e” symbolises a clocking that has been manually entered.
X – An “x” symbolises a clocking that has infringed the rules of the shift, for instance, a ‘late/early’ clocking.
If an employee forgets to clock in/out during a working day, or if they clock too many times, there may be an issue with the number of clockings that appear on the clockcard screen.
To insert and extra clocking, you need to create a space for the clocking to be entered. To do this, click to the right of the clocking you wish to “push” down, to create the space for the clocking.
This will open the following screen, select Insert Clocking and Click OK
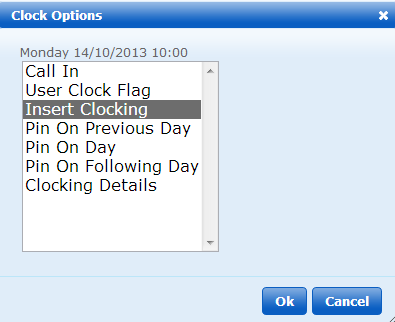
This will open an empty field where a Clocking can be manually entered. Once you have put in the Clocking time, recalculate the day
Once the day has been recalculated, the correct hours will be displayed.
If you create a space for a new clocking and wish to remove the blank space, simply click on the calculator with no information in the space and it will return to the way it was.
To Manually Add an Absence:
It is possible to manually add an absence to the clockcard screen. To do this, follow the exact same steps as explained in the section To manually add a correction line, and choose a type of absence as the correction code description.
Some examples of absences that may be added from the totals screen are:
Time in Lieu Earned/Taken
Holidays
Sick Leave
Unauthorised Absence
Force Majeure
Parental Leave
Remember that any absences that are added in the Clockcard screen are also added in the Absence screen, where a more detailed report of the absence is stored.
It is easier to add absences from the Absence screen, as it is more detailed and can add multiple days at once. This would have to be done day by day in the Clockcard screen. For more information about the absence screen and adding absences, please consult the Absence section of the manual.